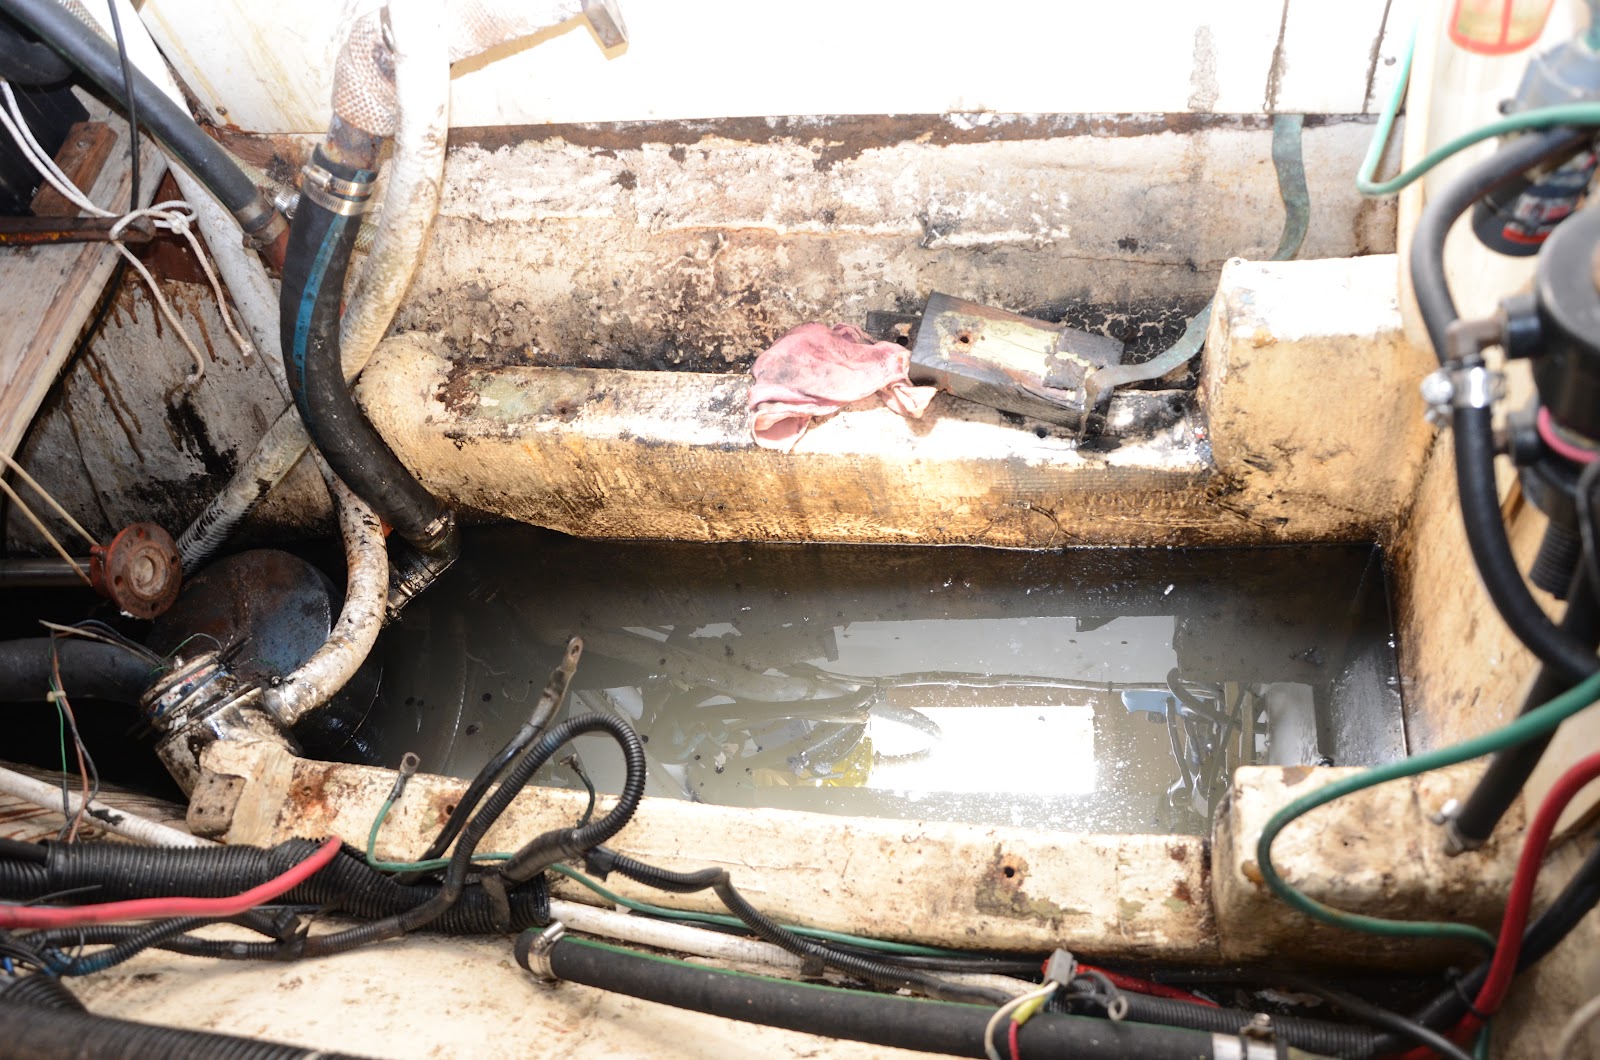
Spent the past week tearing apart Discovery's engine room. After the engine was removed, I began by cleaning the oil and sludge with oil absorbent pads, and after finally getting the bilge dry I was able to really get in and do some damage.
 |
| finally reached the bottom |
I took a closer look at the engine bearers, which are timbers glassed to the hull and forward bulkhead, I had planned to through bolt aluminum angle to them, then through bolt the engine mounts to the angle. Tapping on the bearers produced a totally hollow sound. Oh Boy. I cut a couple of patches out, and after a bunch of water and sludge drained out, I discovered what I already knew deep down, they were completely rotted. The factory had left a couple of spots at the forward corners for water to get in, along with oil, sludge and anything else in the bilge water. I cut away the fiberglass shell, and the port side bearer literally crumbled apart. At some point one of the PO's had re-powered with the Perkins, cut down the original bed rails, and caulked and re-glassed in a 2x4. This and the fiberglass "shell" was all that was supporting the engine, not to mention the loads transferred to the hull when under power.
 |
| the hollow shell |
 |
| literally just fell apart |
Naturally the forward engine room bulkhead was rotted as the engine bed rails were glassed to it. After the engine bearers were out, I cut away the bottom 2 feet of the bulkhead to discover a nice diesel cake on the fuel tank. The bulkhead had rotted and swelled until it made contact with the tank, and then corroded a pin hole, slowly leaking diesel, which had solidified into a wax like consistency, about 4" round. Sorry, didn't stop for photos as I was scrambling to scrape this off and find the hole with my awl. A few pokes, and I had diesel streaming out of the tank which my new fancy gauge said was empty. I jammed the awl in the hole until the leak stopped and I could figure out how I wanted to patch the tank.
 |
| not good |
I ended up using Marine Tex, an epoxy putty impervious to diesel and most acids which the box claims you can repair a crankcase with. Turned out to be good stuff and saved us from having to find someone to weld a patch on the tank, which we were both sketchy about. After draining the fuel, cleaning and scuffing the aluminum, the repair was straightforward. While the tank was empty, I took the opportunity to pull the sender and straighten the float arm, and to clean the tank the best we could through the sender hole just like the water tanks. Again I was stoked to find no sludge or slime on the walls and very little muck on the bottom. I pumped a little fuel from the forward tank in, swished it around with a clean oil absorbent pad wrapped taped to a broom stick. Did this twice, and the tank looked like new.
 |
| Discovery has a fuel booster pump which I used to drain the tank |
 |
| if my wife ever left me I would marry this tool |
 |
| a few minutes with the carbide rasp attachment |
After 24hrs for the epoxy to cure we had the 35 gallons of fuel back in and leak free, with a correctly working sending unit. Hooray.
 |
| cured and ready |
I continued to strip the engine room to the bare plywood bulkheads. The original flake pegboard sound proofing had been covered in 1/4" plywood with white Formica laminated to it. It is basically one step up from cardboard and had been wicking and holding moisture for god knows how long. Once everything was dismounted and the plywood removed, the Fein super-kick-ass tool made short work of the pegboard tiles. When this was out I noticed a few spots where the tabbing had de-laminated from the bulkheads, which I will add to the repair to do list.
 |
| before |
 |
| all stripped... |
 |
| and piled up... |
 |
| and finally out |
Now I can start cleaning the bilge. Again....


It worked out all for the best--i.e.--engine out, time to make repairs, good feeling because goor permanent repairs.--D
ReplyDeleteWow. Pegboard soundproofing? I cant think of anything worse to put on a boat (maybe MDF). I'm looking forward to your engine stringer solution.
ReplyDeleteHey Guys,
ReplyDeleteYou all left a message on my blog about my engine install, but no email address to reply to.
Email me at trisailingfla (at) gmail (dot) com. I think you know how to fix it so it works. Anyway I hope you reply so I can share what I did. Maybe it will help you all out. Nice boat by the way.
Cheers
Mike
tiburon36.blogspot.com